Here at Jalapeno Cycling, we get a lot of requests from people who want us to build their bike from a direct-to-customer internet dealer. While we do sell new bikes from plenty of great brands, we are happy to build up a bike, new or used, that you bought online.
Sometimes, however, we are the second option after a frustrating DIY out of the box. We get this as well. Far too many online bike companies suggesting that their bikes come 85-90% assembled, or even worse, suggest that building a bike up is just a 15-20 minute project. In the best case, people were just frustrated with the project. In the worst case, a component was destroyed during the building process, and the customer needs a solution.
We really hate giving people bad news, so we wanted to walk through six of the most common problems that we see come into the door, and the best way you can avoid them when doing your own build at home. This is far from a comprehensive list or guide to building a bike, and (while we're admittedly biased) we need to throw out the disclaimer that most bikes bought directly or online should be built by an experienced mechanic.
The following is merely the six problems we often see in DIY builds that lead to injury or expensive repairs. If you have questions about things that are not covered in this guide, such as properly installing your front wheel or adjusting your brakes, please consult a professional.
1) Ignoring damage and defects to the bike.
Before picking up a single tool, every amatuer and professional bike builder must inspect the frame and parts for damage, even if the box it was shipped in looks immaculate. In general, you are looking for cracks in the frame or clear damage to the parts. While sometimes chips or wear in the paint on the frame are easily-spotted indications, but you can’t depend on paint to spot a defect. For metal frames like steel, aluminum, and titanium, you should give extra attention to the welds. For carbon fiber, you need to be even more meticulous. Microcracks in carbon fiber can be small enough to be measured in millimeters, but they can cause a catastrophic failure that will end a ride pretty quick. Discovering a defective or damaged-in-transit frame before you build the bike up can be an easy way to avoid a costly internet investment.
In a similar way, you’ll want to inspect parts for dings and nicks. Having said that, for almost every bike we pull out of a box, we do anticipate minor damage to parts that we will have to repair while we’re building up the bike. You can expect that the wheels might be out of true, the rotors are slightly bent, or the derailleur hanger was bent out of alignment.
2) Poorly Installed Pedals
Mis-threaded pedals are easily the most common mistake we see, and unfortunately, it can be a costly goof up. When installing the pedals, use a waterproof grease on the threads, and then install the pedals at least ⅔ the way into the crankarms by hand. If you feel resistance, the kind where you feel like you need a tool to install the pedals, you are likely cross-threading the pedals. This will result in those threads failing, with the spindles falling out of the cranks anywhere from the first ride to a year down the road.
Sometimes these threads can be repaired, but in some cases, this means that you have to buy a crank arm or a full crankset for the bike. Rarely will a company warranty a bike if you cross thread the pedals during installation.
When installing pedals, you want to hold on to the pedal spindle with your hand, and rotate the cranks backwards. If the pedal will not thread, you may be trying to install the wrong pedal on the wrong side (pedals are right and left specific).
3) Backwards Fork
Forks are usually packed backwards in shipping containers to keep the packing boxes as small as possible. With extremely rare exceptions (that are usually found on aero and time trial bikes) rim brakes should face forward, while disc brakes should be on the non-driveside (the opposite side of your gears).
If you’ve built the bike up, and find that the tire is slamming into the bike frame, or that the tire is hitting your shoe when you are turning the bike, you may have installed the fork incorrectly.
Most bikes and frames come out of a box in this position, but you shouldn't leave the fork like this. It will make steering the bike difficult, if not impossible!
4) Poorly Adjusted Limit Screws
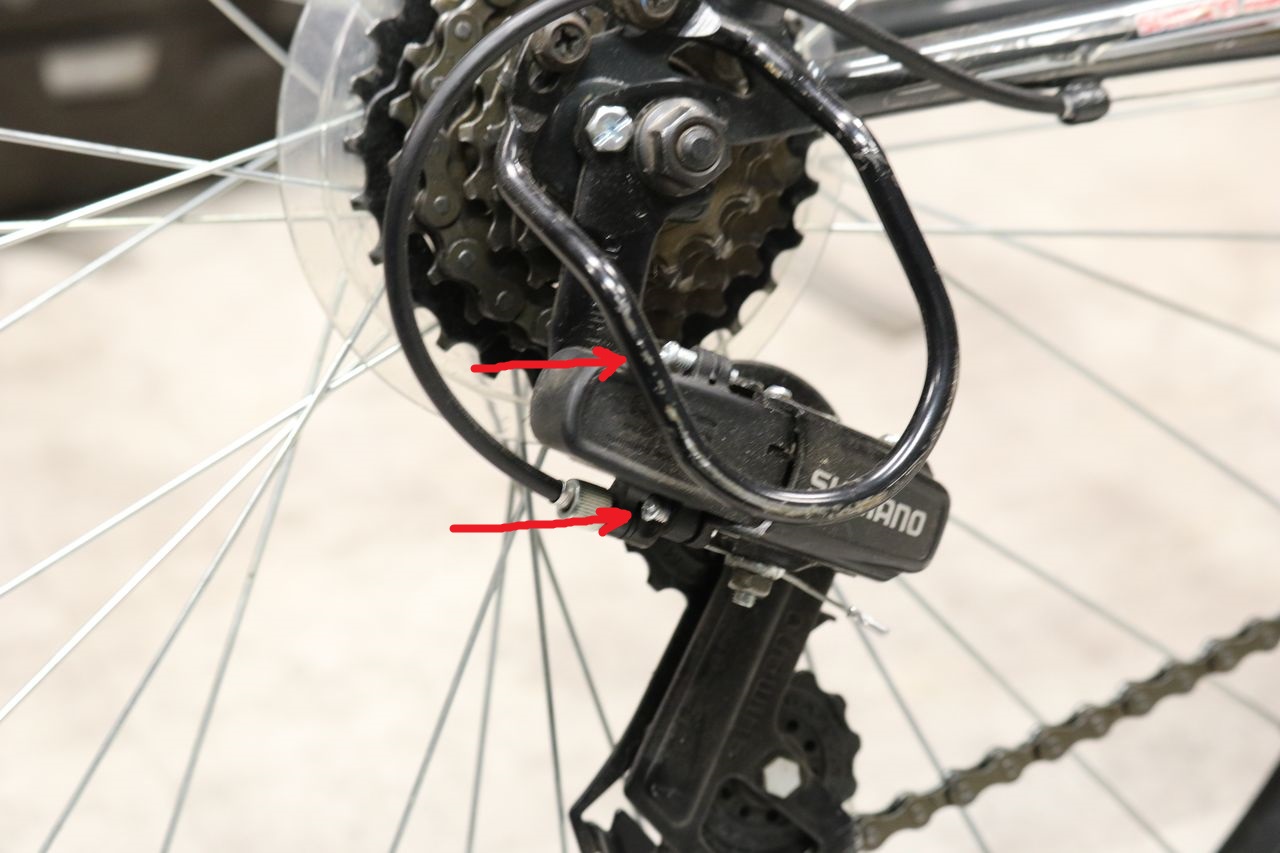
Your derailleurs (the components that shift the gears) are limited in range by a pair of screws called limit screws. In the thousands of bikes I have assembled in my career, I have only seen four bikes come out of the box with perfectly adjusted limit screws, so chances are that the four limit screws (five if you count the b-limit screw) on the bike you bought direct are not in the correct position.
Unfortunately, dialing these in correctly does take plenty of experience. For a bad case situation with the front derailleur, your chain will continue to pop off your chainrings to the outside or inside. Worst case situation with the rear derailleur, and you’re talking about damaging the frame and/or shifting your rear derailleur into your wheel. Be sure to brush up on getting these correctly set up (during the second class of Jalapeno Cycling’s free mechanic’s clinics, we give our students some major pointers in dialing in derailleurs). If you are in doubt, it is better to slightly run the screws tight than loose. Better yet, if you don’t feel comfortable with this project, this might be one step that you should pay a mechanic to walk you through.
These are the limit screws on your rear derailleur. If they are too loose, they can send the chain into your frame or the derailleur into the wheel.
5) Loose Saddle, Stem, Handlebars and Seatpost
We see loose saddles all the time on new bikes that come in. There are bolts that tighten the clamps to your saddle rails, keeping it in place. It is common for many amateur builders to do a fine job with getting close to the proper torque with the seatpost clamp, but since most saddles come with the seatpost installed on the box, we’re guessing that many folks think that those rail bolts are properly torqued. This is rarely the case, and forgetting to tighten these to spec can result in really bad accidents (think of your saddle falling backwards or forwards while riding down your local hill).
On the topic of seatposts and saddles, be sure to apply a fine layer of waterproof grease on the inside of your seat tube before inserting the seatpost (only if your bike has a metal seatpost and a frame). While the results are not as dangerous as a loose saddle, installing a seatpost dry into your frame and leaving it in place for a season is almost a guarantee that your seatpost is going to rust in place. Usually, riders don’t notice what they did wrong until they lend the bike to someone else, or try and sell the bike to a person with a different leg length.
While a less common problem that we see, be sure to tighten the stem and handlebars to the proper torque as well. Under no circumstances should the stem, handlebars, saddle, or seatpost be able to pivot or turn under force (you’ll need to keep the front wheel set in place, possibly with your legs, in order to test the bolts on the stem).
Most budget-minded bikes come with this type of rail clamp, which needs to be tightened. Other models may have one or two allen-key bolts that you will need to properly torque.
6) Tangled Cable Housing
When you are looking at the front of the bike, the order of the cables should go as follows (from the furthest outside to the closest to your headtube): 1) Front brake cable housing, 2) Rear brake cable housing, 3) Front derailleur housing, and 4) Rear derailleur housing. As with a few other items on this list, there are exceptions to this rule.
This isn’t just a matter of good looks. When a boxed bike arrives, and the handlebar is installed with twisted cable housing, the bike typically has a much harder time turning, and usually the shifting and braking feels really sloppy.
The proper, untangled layout of cables. You can see where they cross each other near that front reflector.
The above six steps might take you 15-30 minutes to complete. Now, a complete build by a professional mechanic usually takes about 70-100 minutes.
What’s the difference? Proper shifting, braking, lubricating and other adjusting that we didn't get into in this six step checklist. As we state on our bike build up page, "We must take off and reinstall the cranks, straighten the derailleur hanger, inspect and true the wheels, inspect and adjust the headset, install the stem to the correct torque, grease all of the threads and parts that can bond, adjust the brake calipers, pads, and if applicable, straighten the rotors. We fine tune the brakes and shifting just before our last safety check on all the parts."
If your DIY build has left you frustrated, or the bike just doesn't want to seem like it can be dialed in, you may want to take it to your local shop. Usually their full build will get a bike riding as if it is worth a few hundred dollars more.


